
Another FrankenBurner
-
Posts
625 -
Joined
-
Last visited
Content Type
Profiles
Forums
Articles
Gallery
Downloads
Events
Posts posted by Another FrankenBurner
-
-
Before you go any further, have you rigidized that blanket?
By mortar, what product do you mean?
Zoeller Forge advises Plistix 900F, not ITC100HT, in the FAQ. The consensus amongst the wise elders here is that the ITC doesn't cure properly and just flakes off. This is what happened with my forge back when I was still trying it. Ron Reil's website from long ago is still up and advises the ITC. I have tried ITC, Plistix and Matrikote. I prefer the Plistix 900F as it actually sticks, is affordable and it has a higher temperature rating than Matrikote.
If you are following Zoeller's FAQ page and using Kast-O-Lite 30, the gurus advise a different curing process. Instead of a few hours air dry and a low firing of the refractory, the refractory should be kept in a humid space for 1-7 days. Then slowly fired. I have done the rapid firing and the refractory ends up softer and more likely to crack or rubble. I now apply the refractory, put the whole thing in a bag or tub with a cup of water and leave it alone for a week. This results in a tough solid product. Frosty uses a magnetic block heater to heat the water to ensure humidity. If you want more details, Forges 101 is great for details.
What is your purpose for the floor brick? Are you planning on forge welding with flux?
-
I will typically forge A36 and 1018 with these dies.
Thank you for mentioning that. I would not have thought about that.
I do play with some spring steels and 4140. No S7 or h13.
-
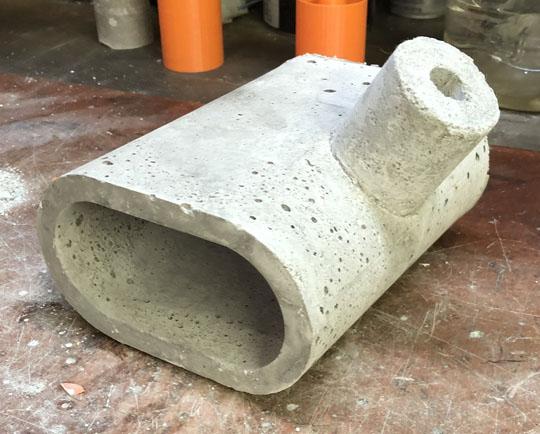
I did not sift out the aggregate. We made a form out of blue Styrofoam covered in packing tape. Then mixed up kastolite to ram into this form along the bottom and up the walls. This created a hollow inner which we put a piece of rigidized ceramic blanket. That was then top coated with more kastolite. This makes a hollow block with blanket inside.
-
You'll be just fine. The yellow tape is good stuff. Read the roll for the instructions. I think it was two wraps(in the correct direction) while being mindful to stay off the last thread to avoid having any tape make it's way into the plumbing. You do not need to spot tight any of these fittings. If you tighten iron pipes into brass fitting too tight, you can crack the brass.
Do not tape the flare fittings. You also don't need to tape the mix tube threads.
If you are concerned about leaks, you can pump the system up with air and use bubbles to check for leaks.
If you are wanting less strain on burners, hard mount that manifold somewhere convenient to access the valves and then run from there to the burners with a longer copper line. The only fitting you would have to replace is that short flare connection. This would require a flaring tool though. This also makes it so you don't have to mount the burners in the forge in alignment with the rigidly secured gas jets.
-
On 1/14/2020 at 1:14 PM, 671jungle said:
How are they holding up?
I was out forging today and remembered your question. This is after the forge had been going for a few hours.
-
I am looking for advice on the dies of my new guillotine tool. They are 4140. I would like to harden them for durability. I don't want to go striking with a hardened hammer face. What heat treat is recommended? Should I leave them normalized and rely on the toughness of the metal or should I harden them and come up with a mild steel hammer to strike with?
-
Looks like a good start. If you are planning legs, it is easier before the blanket is rigidized in.
If you can weld, you can use your burner(once it's built) to bend up some 1/4 inch round. It's minimal, cheap and it looks pretty good.
If you can't weld, you can use nuts and bolts through the can to make the legs.
-
Regulators for BBQ grills are usually set to give 10-11 inches of water column(under 1/2 PSI). Most of these burners need 10 to 40 times that pressure.
Most of us are using a 0-20 PSI regulator or a 0-30 PSI regulator. You can get 0-60 PSI on some of the blacksmithing sites but I have never pushed past 30. I usually run 5 for forging and 10 for welding but I have heard of several people who regularly use 20-30 PSI.
If you amazon/ebay search for a turkey fryer regulator, a qcc regulator or just high pressure propane regulator, there are several low cost versions out there. Some with gauges and steel braided hoses. You have to verify the pressure range and fuel gas. I have one of the cheaper ones and they work. If you have the money, spend the money to buy a quality regulator(Something like a Bayou or Marshall). They aren't that much more expensive and they are worth the extra.
I have my cheaper regulator for a mobile forge and as a loaner. I have good regulators for everything else.
-
If you are thinking 1/2" pipe, that is a nominal size. The actual ID is 0.622 which puts the 8x at 5 ish inches.
The 1/2" Frosty T that I built did well with the 023 mig tip.
-
I thought about the telescoping pipe setup for mix tubes. Approximating a tapered mix tube with steps. Never actually tried it though. I am playing with smooth tapered mix tubes now.
I look forward to your updates.
-
If you are like me, welcome to an addiction.
Even seemingly too small, otherwise scrap metal is a possibility. I avoid stock removal whenever possible.
Any tool you can imagine, you can make. You are limited only by your own intellect and skill.
-
Don't feel bad, I suspect it is a common oversight on the first forge. Maybe not, maybe just me and you.
I can't comment on the propane tanks as I don't use them for this. Their wall thickness is a bit heavy for me. My last forge was cased with sheet metal.
I look forward to seeing your progress. Anything in particular you want to forge or more general hobby work?
-
I have not dabbled in the ribbon burners much yet. I am still playing with burner geometry in the simple burner to learn as much as I can. I am close to feeling satisfied with that and once I do, I look forward to adding to the list of variables with the ribbon burners. I will fully appreciate the lower volume everyone keeps bragging about. (Except for you and your singing forge)
Shortening the mix tube is worth a shot. If it mixes properly in the plenum, your throughput should increase. I wonder if the fuel/air needs to be pushed down the restrictive tube to mingle well. Maybe that is why the 8-9 rule of thumb is around? It seems like the violent change in volume and direction would be good for mixing but every commercial unit I have seen, has the full length before the multiport.
We'll see where the flame blade goes. I like the idea of one in a forge but they are a pain to get balanced. In the mix tube, the mix is spinning. It doesn't like to go long and narrow. I did get it to work and it looks great.
-
Big possible mistake, your sizing. Your math is right if you were planning 1 inch of blanket only for a 6 inch internal diameter(ID) forge. An 8 inch pipe, minus 4" for blanket(2" per side), minus 1" for kastolite(1/2" per side) yields an ID of 3 inches. I am guessing you subtracted the 2 inches of blanket from the 8 inch pipe for 6 inches or did you square the 3 inch diameter instead of the radius?
Two inches of blanket and 1/2 inch of kastolite for the 3 inch ID would be ~71 in³ at 10 inch length or ~85 in³ at 12 inches.
If you were expecting 3 inch ID, great. One 3/4" burner might be too much, maybe not. If you go to 12 inch length, your forge will be fairly small and long which may hinder the burner performance. You might think about 2 smaller burners or a shorter forge.
I had a forge at 3 1/2 inches ID by 12 inches length with a 3/4" burner. It worked well. Made out of a refrigerant cylinder based on Ron Reil's website.
If you were expecting a 6 inch ID, you need an 11 inch case. The larger disposable helium cylinders and 20lb propane cylinders are around 12 inches.
As to the kastolite on the bottom or all the way around, that is personal preference. Just the bottom will be less mass in the forge which will heat up faster and possibly to a little higher temperatures but the walls and ceiling will be fragile to piece bumps. If you are clumsy with hot metal, armor the walls and ceiling with kastolite. It will take a little longer to come to temperature and maybe not get to as high a temperature but it beats poking into the blanket. If you are only half clumsy, the kastolite can be thinner.
Experiments are great. Sounds like you do your homework, you'll have a hot forge in no time.
-
Going back a ways 671. I am playing with blanket and kastolite so often that I had to go back to that post to know what I was talking about.
The originals are still around. I can't say that about the firebricks. They all turned to rubble.
They are great. I have had them yellow on one side and I am able to briefly touch the backsides to move them. One ham handed day I knocked one off the front porch and it impacted the floor while orange. He is still around and shows no evidence of the abuse.
The matrikote peeled off of them but it was applied before I knew to butter them up. I haven't reapplied it yet.
I will be making baffle walls for the mini forges with the same method. We like the size 4.5" x 4.5" x 2". Kind of a half brick. We will eventually have a bunch of them to pile up and point burners at for the odd jobs.
-
I also lack the dexterity for left handed burr work. Good idea though. I am going to give it a try anyway. Makes me want for a counterclockwise rotary tool.
I was worried about bringing it in the house on my clothes as it tends to get everywhere. I had not thought about cleaning out my hair. Thank you for that tip.
-
I just finished up a guillotine this weekend. I took the simple tool used by Glen (GS Tongs) and added Frosty's idea of remoting the dies from the hardy hole to get them both at the edge of the anvil and over the trunk. It is a wonderful tool.

Back when I was tougher than loud noises and high velocity shards I damaged my hearing and had metal extracted from my eye. I was educated. I am now a safety dork and I am no longer tougher than even airborne dust. So there I was, in my leather apron, electronic ear muffs, respirator and safety glasses, while using a rotary burr, I managed to shoot a sliver into my eye. It penetrated, oh goody. I used a strong magnet to get it out but it still didn't feel right so I ended up going to the eye doc again. Luckily all was well and it only added $50 to the cost of this project. I still have depth perception, yay. I will be wearing goggles or a shield when using burrs from now on.
-
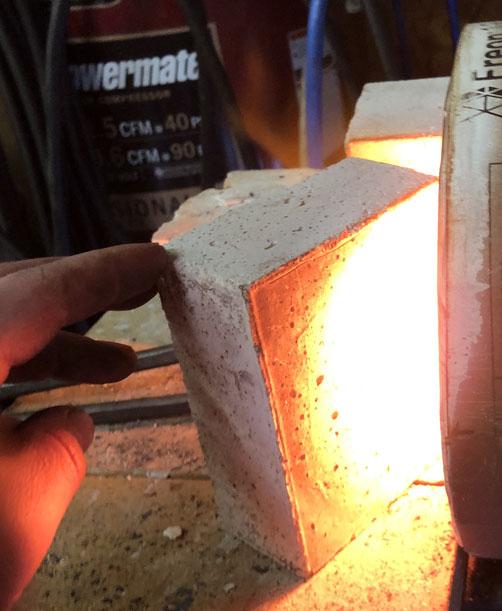
Fresh kast o lite burn off gives the greatest contrast for fun fire pictures. Another mini forge startup:
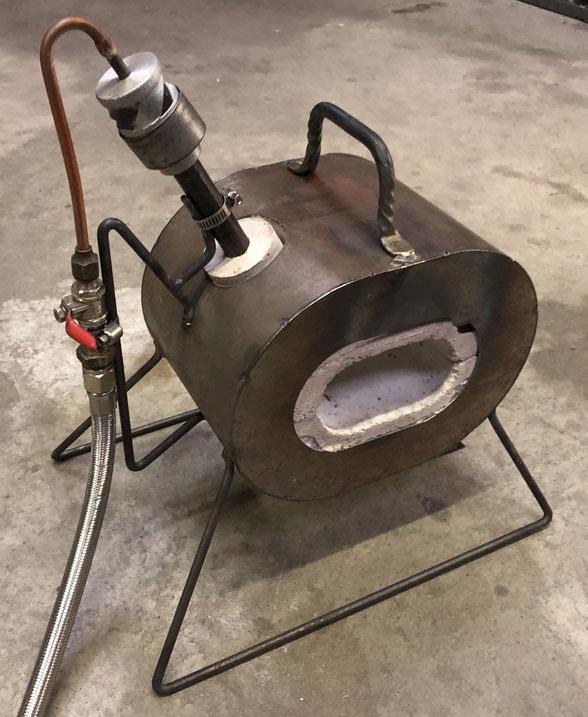
Here is another experimental burner:
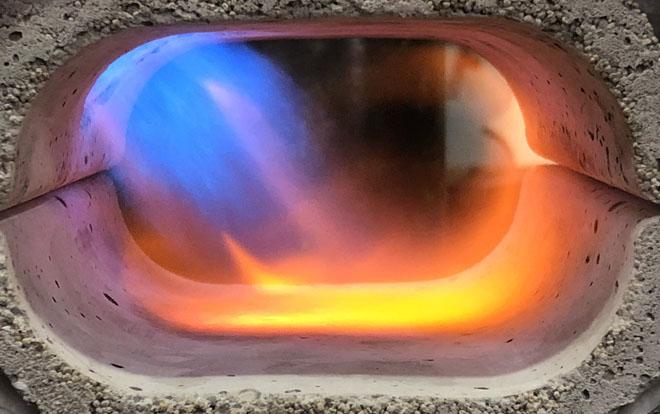
Here is an inner with nozzle for the next mini forge experiment:
-
Copper is acceptable for propane in International Fuel Gas Code. The "sweat" joints are required to be constructed with an alloy with a higher melt temperature than 1000°F. This rules out low temperature solders typically used for home plumbing.
I construct my forge fuel lines with mainly silver brazed 1/4" soft copper lines and brass fittings. Inexpensive, functional, minimal, it looks good.
-
Well that's good to know. I don't want to use mig torch nozzles as retention nozzles. I am trying to figure out how to fire a high alumina ceramic with the tools I have.
Ron Reil has a box of old prototype burners up in his loft which, of course, I had to dig through and investigate. In this box was a copper burner that looks like a predecessor to the Hybrid burner. It has a mig tip nozzle as a flame retention nozzle. He said he could not recall who, but that someone had sent it to him years ago. Based on the Nanomongo burner on his webpage, which he credited to you, I wondered if this mig nozzle burner was also something of yours.
-
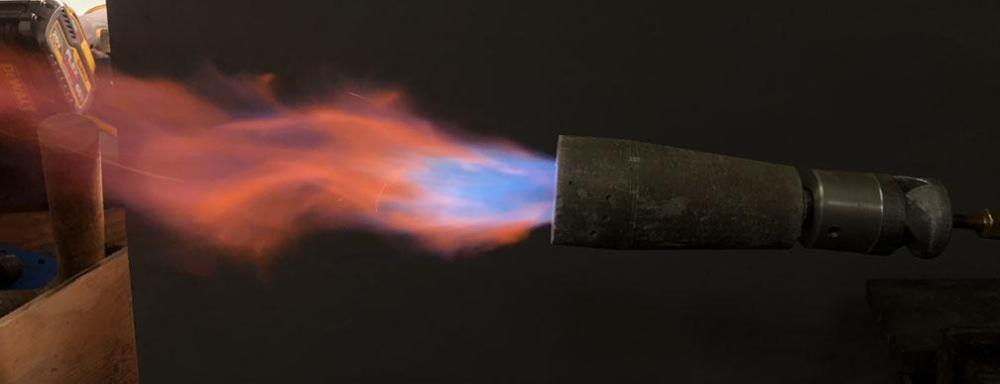
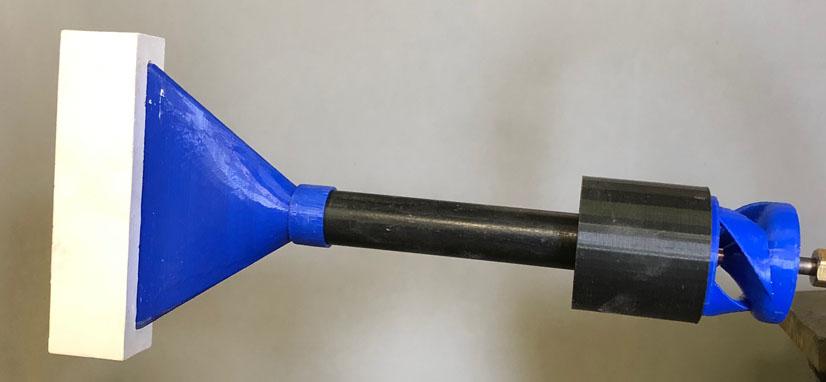
Here was one of my nozzle experiments a while back. We call it the flame blade. The intent was to stretch the heat source along a large length of the wall and have a short length flame. The geometry is critical on these guys and must be balanced with the burner. As I am still tinkering with burners, I had set this one on the back burner until I eventually maybe finalize my burner design so that I can then produce one of these which matches that burner.
Here is the complete 1/2 inch burner still in plastic and plaster:
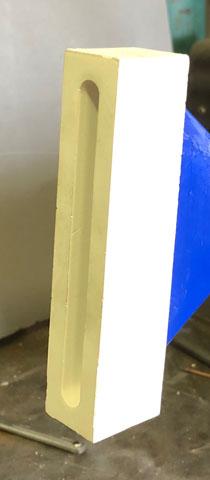
Here is a shot of the narrow channel of the retention nozzle:
Here is the flame it produces:

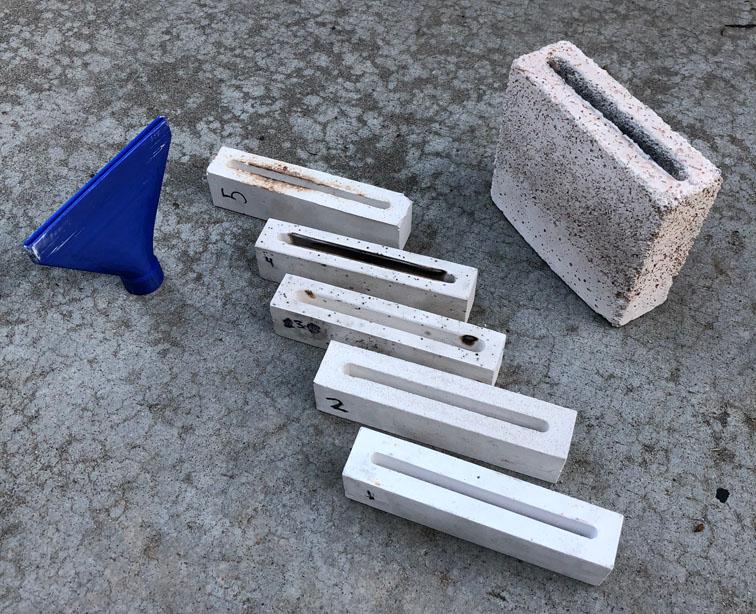
This was after several failure experiments to get the geometry all balanced:
-
I don't currently. We have built 6 forges with cast in refractory retention nozzles with kast o lite. Several of them have many hours of operation and show no problems. No longer having a steel nozzle is a great thing. Every time I used to start up my forge, I would hear little popping noises as the scale would pop off the always thinning stainless nozzle. The refractory nozzle also gets the mix tube a little further back from the inner forge and conducts less heat to the mix tube.
Kast o lite is chunky clunky but it works well. It takes the heat and it is tough stuff. Ribbon burners could be made out of it but it sure would be nice to have something finer for that work. It took a bit of experimenting to get the kast o lite/water ratio as good as we can get it. It is much drier than we started out. It ends up smooth if in a form, even at the drier mixes.
I have been dabbling in high alumina ceramics and the bentonite/zircopax concoctions but not enough yet to have any conclusions. If I could get either of them right, it would be nice. My TIG welding torch has a pink high alumina ceramic nozzle which is thin walled, thermally stable, and seemingly indestructible. I would like to figure that out.
-
If you hover your mouse over the name of the person on the left side of their post, it will open a small pop up menu showing profile stats. In that menu, at the bottom left is an envelope icon and the word message. Click that and it will open the private message screen.
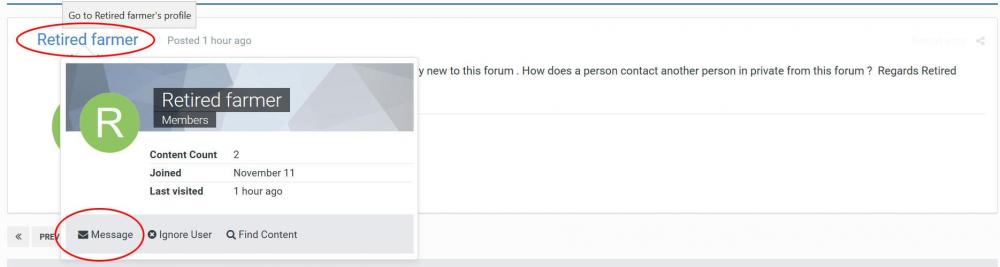
Alternatively, you can click on their name to view their profile which also has a Message button.
Another way, at the top right of any page here, you will have an envelope icon. Click that and a menu opens. In that menu is a Compose New button. You will have to type the name of the person you want to message, if you go this route.

-
My experimental nozzle prototypes start their life as plaster of paris to avoid wasting refractory on total failures. The plaster nozzles present the same brilliant orange display the first firing. Somewhere in my readings, it was referred to as calcination.


Propane Forge Build Critique
in Gas Forges
Posted
Get some dish soap, mix somewhat thick with water, spread over your plumbing. This can be done while the burners are running with valves open. If you start making bubbles, you have verified a leak and located it.
The second video you posted shows part of the plumbing very briefly and it looks like maybe the gas tape was put on backwards. I can't tell for sure but I figured I'd mention it so you can verify. If so, this can cause leaks.