
Another FrankenBurner
-
Posts
625 -
Joined
-
Last visited
Content Type
Profiles
Forums
Articles
Gallery
Downloads
Events
Posts posted by Another FrankenBurner
-
-
I would be very happy if I could find a case for $60. I am currently going the pottery supplier route and paying almost $9 a brick. Amazon doesn't seem to have much, or I am missing them and ebay is where the shipping prices are sometimes $11 for a $6 brick. I'll keep looking, thank you.
-
Thank you for that. I used a k23 brick as a baffle wall for about a month before it turned into a pile of rubble. I am now using k26 bricks. I armored one with metrikote and another with kast o lite. I have not been using them long enough to say anything about them other then they are still currently intact with no cracks. I have had a hard time finding them affordably.
-
Sort of an older style Ron Reil burner. His website has a lot of information about similar burners. If you could provide an image of the flame it produces, that would help you get input. Also, a better set of dimensions. Are you using a mig tip in that cross pipe or just a drilled hole? You state orifice tube so I suspect the latter. What size orifice? How long is the 3/4 pipe?
Just looking at the pictures and taking some guesses here. The 3/4 pipe looks to be on the long side and the reducer might be a bit small on the large ID. This burner may have a problem inducing enough air. An image of the flame can be looked at to see if this is true.
Also, the knob is connected to a small valve which is most likely a brass on brass tapered assembly. There is usually graphite grease but no real seal on the knob shaft. On the bbq it was probably using 11" WC pressure which is about 0.4 PSI. I am not sure how that will do with what you are throwing at it. Either way, I have seen them at the 11" WC leak out the knob shaft. In a few cases it ignited and sent a good flame out. At higher pressures, I could see it not being fun. While it can be used to meter to some extent, it is more of a guillotine. Better control would come from a needle valve.
All that said, it's a cool looking burner. The last burner I thought might not induce enough air turned out a beautiful flame. Did you bell the 1 1/2 pipe? How did you go about it? I look forward to seeing the flame. Then some of the wise ones can chime in and if there are troubles they can give advise on how to make it better.
I also recommend burners 101 thread on this forum if you are into designing your own burner. It is a long read but it has a lot of information on the science of burners and their parts.
-
No problem on the clarification. I look forward to updates on this burner so that I can learn from them as you have.
-
As to the joy of tinkering, this is playing with fire but involves math, science and trial and error. I can't help but enjoy it. Years ago this process involved a stick, a campfire and constant scolding's from my parents.
-
Wikipedia paraphrase: In the venturi, the velocity must increase because of the constriction which increases it's kinetic energy but this is balanced by a drop in pressure. The Bernoulli equation is invertible and pressure should go up when velocity goes down but expansion causes turbulence to jam up the works.
We see lower pressure and lower velocity because this turbulence robs energy? In our case, that a lower pressure zone is good as the higher pressure stream is happy to move to this lower pressure zone and get out of the way of new incoming FAM which allows for higher induction? Which can also slow the FAM stream enough to prevent lifting. That is making sense now.
The more I learn, the more I realize the wisdom of the people before us. In this case, I am referring to the wasp waist burner but it tends to hold true in many areas. The more I realize this, the more I realize I am just reinventing the wheel.
Thank you for the kind words. Guru is probably a bit generous but maybe someday. It's easy to learn quickly when talking to people who know more. There are a lot of those people around here.
-
With a larger step in a stepped nozzle, what is the goal? Is it flame retention exclusively? Better mixing?
I seem to recall you stating that stepped nozzles required higher velocities. I can't seem to find where I read it though. Is this true? What happens at slower velocities with a stepped nozzle which makes them incompatible? I have been talking to Frosty and he brought up cavitation possibly being caused by a step at higher velocities but I haven't talked to him enough to wrap my head around it all.
I remember reading on Ron Reil's website about the nanomongo burner which is stated as your design, that it had a 1:12 tapered nozzle but that it had an 1/8 inch step which was critical to the design as the burner was built with thin wall copper. It's been up for a long time but do you recall what happened without a step? Any idea on the why's? Did you ultimately go with the straight stepped nozzle because it was better in some way or is it just easier to build?
The volume increase should cause the pressure to go up and the velocity down but they say that doesn't quite hold true with a venturi due to turbulence and with a large step, it seems like a violent change in volume.
I see that with a tapered nozzle, depending on velocity, the flame will settle along the length of the taper where it needs to. With a straight stepped nozzle, I don't quite understand what is happening or why controlling the amount of over hang changes things. Is this due to drag/turbulence?
Admittedly, I have more experience with the tapered nozzle. I will be building stepped nozzles of different IDs to see if I can wrap my head around what is happening.
-
I will try that. Are you speaking of a stepped type with a larger step?
I would like any thought, suggestion, criticism you are willing to offer. I have plenty of burner for my forges, I did a few burners ago. At this point I am just having fun changing things up to see what happens. I try to educate myself and guess what will happen but being wrong is sometimes just as good as being right.
-
Thanks Mikey.
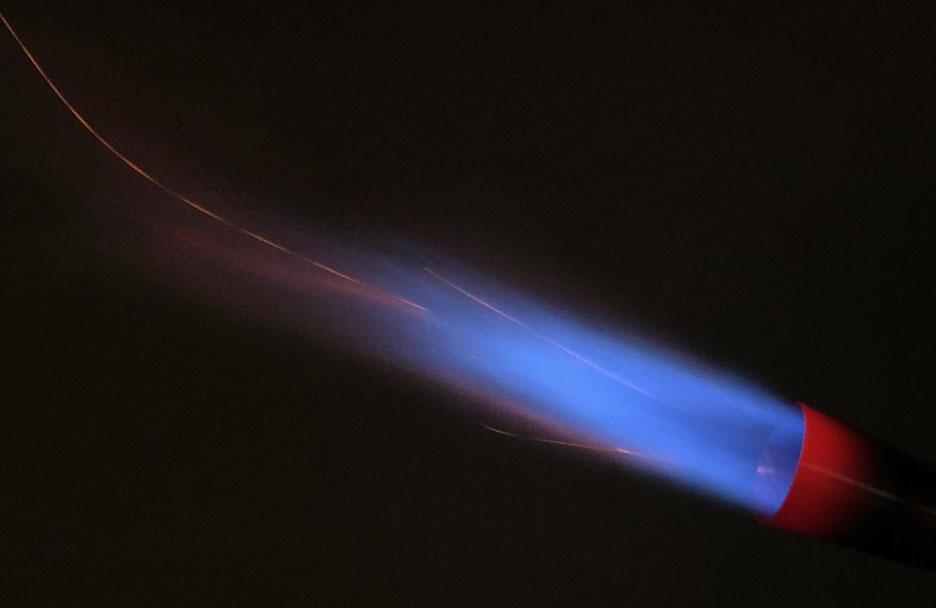
Nothing was added. This is a different burner then the last set of flames. I have been experimenting with different shapes to see what they did to air induction and mix. This particular burner was trying to entrain as much air as possible with lower velocities. As you see in the image, the velocity is still pretty high but it induces enough air that I have to close the choke most of the way. Frosty explained the why's on the wasp waist burner and so I started to tinker with their geometry.
I haven't had much time to tinker with it but it induces enough air with the 0.023 mig tip that I will be putting an 0.030 to see how that does. With the 0.023 it is still pretty fast at higher pressures but it seems happy with lower pressures.
It induces enough air that it is picky about it's pressure/choke setting but it also seems to be adjustable to a large range. I have another end goal to produce a small output burner for a two brick forge.
I added an airfoil shape to the ribs which hold up the accelerator block thinking more spin and at lower pressures it is noticeable in the flame. I think it adds a roar to the flame which may be instability but it seems fairly stable unless given too little choke. It only has two narrow ribs which put it more in the linear category but it has a sliding choke like a Mikey.
Mostly I am just having fun playing with burners.
-
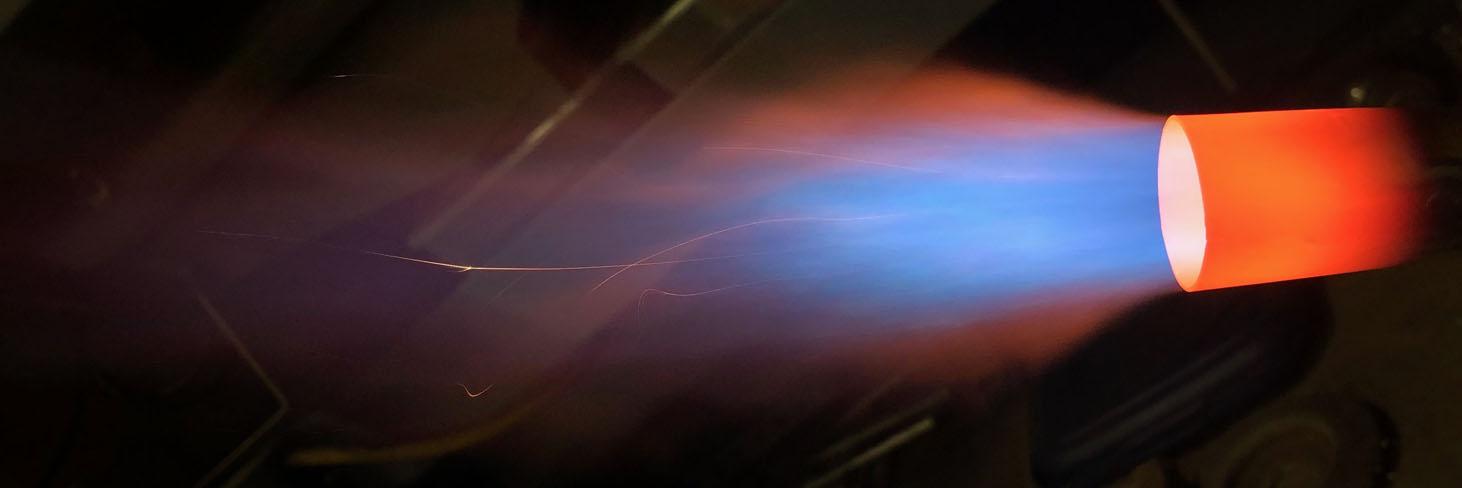
That is a good looking flame. It weel heat! Good job.
The yellowing on the nozzle(flange) leads me to wonder if this is a galvanized part. People are often choosing stainless for their nozzle as it holds up longer to the oxidation due to heating the metal. In your very first picture of the flame you can see that the part has a cherry to it.
You also have an 0.025 mig tip which I believe is on the smaller side for 3/4 inch. I believe Mikey burners usually use an 0.030 (his book states 0.023 or 0.030) and Frosty T's use an 0.035. Due to the holes for air inlets, I don't know that you can go larger and induce enough air.
You made a comment about test 2 requiring you close down the air inlets to start the burner. My Mikey burner does the same. Close the air most of the way, light at lower pressure(5PSI), wait a minute for the nozzle to heat, open the choke some more and wait a few minutes until opening it completely and ramping up the pressure. IIRC Mikey states this as the startup procedure in his book under the tuning section of the half inch burner chapter.
You state that in the final test it goes out after about 2 minutes of running. What do you mean? Does the flame lift off the end or backfire or ?
All this said, if you get the flame stable and point it into a forge, the forge is going to get hot.
I imagine Mikey will be along soon to give his read of the flames and correct anything I have wrong here. I look forward to seeing this burner in your forge, please keep us updated.
-
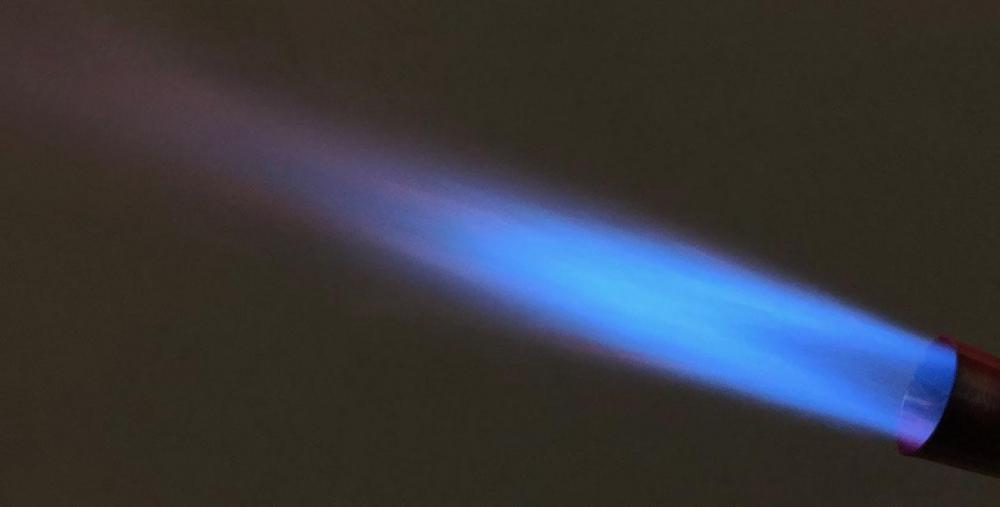
After Frosty's talk of lower velocity, my experiments headed a little different direction.
I only had a minute to play with it when finished so this was a quick picture before any tuning. Forgive the back drop again.

I will post more images when I have time to experiment with tubes/tips/pressures and tune it.
-
The baffle wall is used to help prevent radiant energy loss from the openings. In your case, the front opening of your forge. You could place a few bricks on that front brick so that you can adjust the opening as you need it to let stock in while keeping is smaller then the main opening. These would not be placed right up against the forge but a bit in front of it to leave a gap so that spent gas can still escape.
Here are a few posts from Mikey in forges 101 talking about it:
-
What rigidizer are you using? If it is fumed silica/colloidal silica no need for waiting to dry, use a torch to heat cure it. Be careful of escaping steam.
A post on page 2 of forges 101 talking about it:
-
We would need more information on that burner. What is the main tube ID and length? What size is the orifice/jet/accelerator? Have you lit this burner yet? Could you get an image of the flame it produces?
This is in the tube burner category so Mikey is the guy when it comes to them. Burners 101 is a long thread but has lots of good information, a lot of which pertains to tube burners from Mikey. One big one to point out, using the holes as air inlets produces a lot of turbulence which slows air induction. Burners like yours generally can't provide enough air and run rich which is then a carbon monoxide producer as well as not being as hot. If you go to Ron Reil's website and look into what he called the minimongo, it is similar and contains his thoughts on how it performs. If you like the style, look into the Mikey burner to see how he accomplishes air induction.
This is not meant to be discouraging, the burner itself looks good and may be able to produce a good flame or at least a good enough flame that you are happy with it. If you post a image of the flame you are producing, it can be looked at and recommendations can be made to get your burner running the best it can. One of my forges has a burner which is too big and runs quite rich and it works just fine as long as I am willing to accept that it uses more fuel to do the work. I just wanted to warn about the possible lack of air and production of carbon monoxide if so. Be sure to be well ventilated as we all should be anyway.
If in the end you can not get this burner to run to your satisfaction, it appears you have the shop skills to produce another burner which will. At that point I would look into the Frosty T if you want simple or the Mikey if you want configurability and then build one to it's specs. Unless you want to design your own in which case, you can read burners 101 to understand the science of the burners, to avoid some of the common mistakes and learn to read your flame so you know what you are looking at.
The general thought on a properly functioning 3/4 inch burner is 350 cu. in. of properly insulated forge space in order to get to welding temperatures. This recommendation is a general thought and it all depends on the design and build of both the burner and the forge.
-
Forge volume should be calculated to determine what burner setup you need. Suggestions have been made and can be made based on volume and whether or not you intend to forge weld.
Too little and you have a cold forge. Too much and you make puddles of your work. A bunch of examples of the former on this forum.
-
I don't know the right answer but I do know if you are looking for curse words, even if you get them, the moderators will take them back away. If it were mine, I would assume leaving it in and covering over it would be a bad idea. Bad foundation and all. As far as the kast o lite vs metrikote/plistix, a current method which seems to work well is 2 inches of rigidized ceramic blanket, 1/2 layer of kast o lite and a final thin layer of metrikote/plistix. I believe the wise ones are steering people away from ITC towards the metrikote or plistix. I went with the metrikote and I am happy with it but it sounds like people are happy with either choice.
I personally would attempt to remove the cement however possible with the least damage to the kaowool. Then patch the spots with more pieces of kaowool and rigidize. Then coat with what you choose.
The forge itself looks good. It sucks you had a snafu in there. At least you noticed it instead of just having an inferior forge, now you can over come it. Based on how it looks now, I doubt you will have any problems making it work in a way that you like.
What is the internal volume planned to be? What burner are you planning on using?
-
The burner is a linear design, the most popular being the Reil burner. If you look it up, he has a website dedicated to the build sizes which worked best for him. His page might save you some effort on the second build. Though, just to mention it, Ron Reil no longer uses the Reil burners. Your flame is a reducing flame which is indicated by the green in it. You are not inducing enough air. I would start with the inlet reducer, yours is too small. On the 3/4 burners, it is recommended that the inlet reducer open to at least 2 inch and have seen suggestions of 2.5 inches. Mikey recommends 3x the mix tube inner diameter. I don't know the actual inner diameter of your mix tube but if it were 1 inch, then the reducer should be a 3 inch to 1 inch. This is just one thing I noticed by quickly glancing at the drawing.
Burners are built on ratios. The energy output is limited by the mix tube diameter. The length of the mix tube does best as a multiple of it's length, the best starting point is 8 to 9 times the inner diameter. The inlet reducer size is also a multiple of the mix tube diameter. The jet is diameter is selected based on the mix tube as well. There are rules of thumb but they are just good starting points if you are venturing on your own design.
If you want to keep tinkering, this burners 101 thread is filled with great information. If you just want a burner to work as intended, look up a known design (Frosty T, Mikey, Reil burners) and build the burner to their specs.
That said, as Mikey and Frosty always state, your burner is hot. If you were to put it into a forge, it would make metal hot. Nice job.
-
Darn stuff keeps changing and nobody asks me first. - Frosty
-
Here is another flame produced with an experimental burner. The flame on the previous page was using an .025 mig tip which was a shorter (3/4") variety. This flame is using an .023 mig tip which is 1 1/4" length. By adjusting the choke, the flame can now be brought through a range from light blue to dark blue to purple. Unfortunately I was unable to capture those colors to show and have had a challenge taking images which match the colors I actually witness.
Here is another with the same mig tip. This one the choke was closed a bit more and more lighting was provided. You can see some green in the flame which was not visible to the eye. The flame looked uniform and light blue. The camera changed the colors but I don't know if that means the flame is slightly reducing and the camera picked up something I couldn't see.
-
I did not mean to be discouraging in any way, quite the opposite. As Frosty stated, there is nothing stopping you from using your forge as is. It will demand fuel is all. If you are new to blacksmithing, you will take more heats as you are learning the basics which compounds the fuel cost. Just something to know up front. If the fuel costs ever become prohibitive, the forum has the thread Forges 101 which contains lots of information to help build a forge which can lower fuel costs.
An example of the knowledge contained in Forges 101, you stated that you thought that the flame was heating the piece directly and the forge helped contain the heat. Here is a quote from Mikey on page 2 of forges 101 which helped how I thought about it:
QuoteIt only takes a moment's comparison of the heat loss through exhaust openings with heat loss through forge walls to make it clear that just insulating the forge alone is a waste of time...
You are insulating the forge to trap heat in it it for a particular reason, and that it to super heat its internal surfaces into high incandescence; hopefully into the white hot range. Any efficient forge is a radiant oven first of all. The burner flame is primarily a heating element for that radiant heat transfer; not for heating stock directly; get that straight in your mind, or give up all hope of knowing what you're doing in gorge design.
You also don't want the flame impinging on your piece as it can cause more scaling.
You made mention of the joy being taken out of making things via the cnc machines. This makes me think you enjoy making with your hands. For me, blacksmithing is therapeutic and mesmerizing. I hope it brings you a similar joy.
-
The reasons I asked about the brick have been covered by the last couple of posts but I will add some to them. I am no expert and this post is simply the details as I know them currently.
There are a few different types of "firebrick" which all have their own pros/cons. These heavier fire clay bricks are typically used for their durability with heat but their insulation value is poor. The other end of the firebrick spectrum is a very light (ounces), very porous, soft fire brick which has better insulating properties but with the type of thermal cycling they see with a forge, they turn to rubble in short time. Mikey has brought up the K26 brick as being somewhere in between as a brick which has some insulating value and some durability. I am using the K26 bricks armored with kast o lite as my baffle walls but have not used them long enough to know about their long term durability. I was using bare K23 bricks prior and in a few months they turned to rubble. The light bricks and k26 bricks are also more expensive typically.
There is a balance between mass and insulation which, as ThomasPowers was getting at, can be selected for the desired operating properties. We like insulation because it keeps as much heat in the forge as possible which helps attain higher temperatures, quicker, with less fuel. We like mass because it retains heat which makes the forge temperatures more stable and because it can be much more durable.
-
I run my forge in 0°F once and again. Both things ThomasPowers advised, hold true for me. I have a smaller forge so tanks freezing isn't as big an issue but I certainly tend to hang out in the area I can be warmed by the forge. Another thing you have to deal with is a cold anvil robbing your metal of it's heat. Also, people tend to tighten up the area around them to retain some of the forges heat but you always have to be thinking about carbon monoxide. It's easy to forget/overlook and it kills. It sounds like you are working in a more open area though. Another thing I was warned of is that the forge linings like to absorb moisture, if the forge has not been lit in a while, be gentle/cautious on start up. In my case, I have a cast inner lining which can trap steam and possibly break up. If you see steam or hear anything weird, go very slow. The last thing I can think of, your air mover may cause some problems. If that draft goes through your forge in any way, it might push a lot of your heat right out the doors.
-
Those bricks look like they might be the dense heavy firebricks. Do those bricks weigh 7 lbs or so a piece?
-
You're welcome. I reread this thread to pick up more information and take notes on reading the flame and so these two posts were fresh in my mind to point out.

Let the chastising begin
in Gas Forges
Posted
That is a decent looking flame. It weel heat. Nice job.
It is a reducing flame which means it is not inducing enough air like I suspected. It will heat as is but it will not get as hot and it is pumping out the carbon monoxide so be sure to be well ventilated as we all should. Some people prefer to use a reducing flame as it can prevent scale building up in the forge.
If you want to make it better, the first thing I would try would be shortening the mix tube(3/4 tube). You stated it as being 9 inches but you also say with the end bell shape which I am not sure I follow. The general rule of thumb for a starting point length is 8 to 9 times the ID of the mix tube. If you have a mix tube diameter of 0.824 in(3/4 pipe) then this would be 6.9 to 7.4. If you go this route, start longer then that and cut off a little at a time. Can't add it back after you cut it off and all that business.
Other things that could be done are increasing the size of the end reducer and looking into using a mig tip instead of a drilled hole for the jet/orifice. Both of these would be more difficult then cutting off lengths of the mix tube.
All that said, I wouldn't do anything until the experts give their opinions as my knowledge is limited and I would not want to steer you wrong. Also, the flame looks good and can be used as is. One of my forges has a burner which has a more reducing flame and as long as I am willing to accept the increased fuel usage and carbon monoxide it makes the forge plenty hot.
Also, to note, even though you plan on refractory in your forge, it is still recommended to rigidize your ceramic blanket. You can do that before the refractory and use your burner to heat cure it. On page 2 of Forges 101 is some information on the process.