
wd&mlteach
-
Posts
224 -
Joined
-
Last visited
Content Type
Profiles
Forums
Articles
Gallery
Downloads
Events
Posts posted by wd&mlteach
-
-
Here is the build.
Step 1
Print and cut out pattern.
Step 2
Trace pattern with scribe, I prefer Sharpie. Also, transfer hems, seams, bend lines, and circles

Step 3
Cut out
Step 4
Shape mold cavities.

Step 5
Secure with tape, keeps them where they should be.
Step 6
Shape points
I used an old center from a lathe to help shape these.
Step 7
I don't know the technical term for this but you have to make relief cuts in the caps to allow them to be shaped correctly. This is how I did it, about an 1/8".
Step 8
Hammer relief cuts down to tube diameter.
Step 9
Solder tubes and points together. I am not the best at this, I know. I cut a vee block to hold the tubes still while I soldered.


Step 10
Cut out holes in top piece. I used a center punch to start the holes in the tinplate, then I used the aviation snips to do the rest. A big punch would have been great. After the holes were cut I folded down the hems and folded the rest of the box mostly by hand.
Step 11
Flare the mold cavities so they can be attached to the top. Same 1/8"cuts as the tips, the cuts folded over with hammer on a stake.

Step 12
Trial fit and then solder tubes on.
Step 13
I cheated and spot welded the handle loop on. I was running out of time and it was quicker. Tomorrow I have to open up the end points on the tubes with an 1/8" drill bit and bend the top bar to tie the wicks on.


-
Thanks for the suggestions. Even though I teach design it is sometimes hard to think a different way.
-
I decided to go ahead and manufacture a treadle hammer. I have a copy Marx Gade plans to start off with and modify as needed. One of the modifications I think I need, is to make the swign pivot adjustable. It seems to make sense to me to be able to change the head height durng the swing as needed. But as I have never actually used one of these hammers, I realy do not know how vital it is. If I were going to change the head height, what is a cheap source for a gear rack and pinion?
-
A couple of months ago I was on a quest to make candle dish swages. I was going to try to turn a few shapes out of steel on the metal lathe to make some new forms and I never got the time, sorry Collene. I am still using the Aluminum ones. The good news is that I can cast them as often as I like.
About a month ago when I was teaching sheet metal layout I had the idea of making something other than a dustpan. I have made so many metal dustpans over the years I am sick of them and they are starting to pile up. Anybody want one? Since I made the dish and holders I figured I should have some candles to match. I know you can buy them at the dollar store, but to me it isn't the same. So I decided to make my own candle mold. I did some research as to what they looked like. As far as design goes, I chose one that was pretty simple. Nothing more than a couple of hollow tapered tubes that are capped and held together at the bottom with some solder. The top is merely just there to help you fill the tubes and to keep you from dumping hot wax down your arm as you pour.
The only information I could find related to a plan for one comes from an eBook that google. I know I could have figured one out but this works, and I went with it. Maybe next time I will design my own.
By the way here is also a good ebook about how light was made before electricity called the Old west Surrey: some notes and memories by Gertrude Jekyl.
The drawing in the first book was ¼ scale and I figured that if I had to draw it out in CAD I might as well share it. The mold consists of two pages and should be easy to print out full scale as they are PDF files.
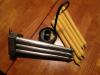
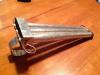
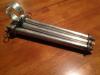
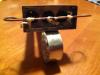
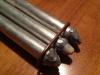
The one I have pictured is a little different from the one in the book. I added some extra 1/8 welding wire one at the top to tie the wicks to and one at the bottom to pull them tight. I also made the handle bigger, just out of scrap tinplate. I used 30g tinplate as that what I have.
Before you use the mold watch this video on how to use a candle mold. http://jas-townsend.com/product_info.php?cPath=30&products_id=72 It does a good job at explaining the task. When I pour candles I use a Zip-Lock Freezer bag and a sauce pot instead of a crock pot and liner. I put the wax in a quart bag and use a clothespin to clamp it on the side of the pot while the beeswax melts. I do not use boiling water, just hot. To set the mold up I spray the inside with cooking spray and then I tie the wicks on the welding wire stops. I do not weave the wick in and out of each mold, just tie them individually. Then I dip the point end of the mold in the hot wax three or four times to build a wax plug up on the end. This plug keeps the hot wax from running out when you fill it. Then I use the bag to fill the mold cavities. The wax will shrink when it cools and the candled will become hollow, you will have to backfill each of the molds, so keep you wax hot. The mold makes about 6 candles from one pound of beeswax.
I hope somebody can use this and try not to make fun of my solder job. It is pretty embarrassing. If you want assembly instruction please let me know and I will post.
-
I have two post vises at home and one a school. Of the two at home I have one of each, a stationary one and a mobile one. My shed at home serves more puropses than it should and so the ability to move somehting out of the way is great. However, it is also nice to have one mounted at a work bench for the times that I need it there and more stable. I actaully preffer both options as it is the best of both worlds. The one that I took to school is mobile and it always will be. Not for the fact that I need to move to help the kids work but more for the fact that I need to keep it away from the welders. The only table that is close to the forge/furnace at school is the welding table. That is just too close to new welders. If you need pctures of the various mounts I made let me know.
-
Thanks for all of the feedback, folks. It is nice to bounce these ideas off of a few people that have experieinced opinions. I will let this one go. I would rather pay more at a later time for a nicer anvil than buy another cheap anvil that is a "fixer-upper". I already have one of those, if I get the urge to do that. By the way I asked for a second picture today of the table and I was sent this picture. It looks like it was scalped.

-
I found this one on CL and my wife will not let me buy it, somthing about maternity leave. I tried tipping stuart off to this one as they want 300. I assumed it was sold. Then, they emailed me today and said that it was still there, asking if I wanted it. I have another picture of it giving a length of 33 1/2. It is not small. It looks to me like the plate is missing, and not worth it the time. What are your thoughts?


-
So a couple of weeks ago in the middle of hurricane Sandy I spy this anvil on CL. I contacted the guy right away and made arrangements to have a budy of mine in Philly pick it up after work. As I myself had to work and could not get there soon enough. I thought "It was as good as mine," and it was also 75 dollars for a 250 pound Fisher. The guy posted it saying "it was no good for blacksmithing as it did not have the ring." Wow what a spectacular deal, I thought. Then my buddy goes to pick it up and the guy says he sold it. The fellow sold it to in his word "some pushy fellow" that still asked for the five dollars back after he gave him $80. Hah!
I guess dperk you are the final winner here. I am glad it went to somebody that will use it, good luck in all you do with it and thanks for posting pictures.
I may be wrong but it sure looks like the one I was going to get.


-
John, I will make sure that I have a copy ready for you sometime in the near future. Private message me an email and I will make sure you get a copy. The only caveat I have is that if you find a way to improve this process let me know. I also have a PowerPoint that I use to explain each step along the way and as a student reference. I also have a generic rubric for grading if you wish. If you can use any of it let me know.
Frank, fantastic addition thanks for commenting as it helped to enrich this post. When I did my research for this activity I just searched google, hardly exhustive by any means.
So, if I order the book through you do I get a signed copy? -
Phil,
Looks good, looks a lot like my second firepot. Here are updated pictures of firepot 2.0. It is a hybrid of sorts a combination of I believe parts from a masonry system and a welded pot. The original fierpot from the masonry setup was I think cut with an OA rig and there was not much left. However, the bottom parts were nice and usable, so I decided to use what I had. The steel I chose for the pot was 3/8", I think.
A suggestion, that seems to be working for me is that I have my sheet metal painted and it seems to be holding better than I expected. I did not use anything fancy, just Rustoleum in the quart. The actual firepot is painted with high temp grill paint and it also seems to be holding or not burning. I should temp the pot sometime and see what that reads, just for fun.
As you can see in the pictures all of the paint is still there even after firing.
Just a suggestion, heck you may have been planning to paint all along.
And one more thing I still have not bolted mine down it just sits there floating like. So far no problems and I move it all around my property. I still have firepot version 1.0 and the cutout from the OA torch for version 2.0. I may someday make it modular and have the ability to interchange the firpots. The advantage is thae version 1.0 was much more cheaper to run, but limited in size. Version two has a larger capacity but eats more coal. Also it might just be for fun and to see if I can do it :)


-
Yes, the difference between 1" and 1.000" is quite costly.
-
No, I am serious. I was an art major a long time ago and I can tell that you have a gift that very few have. You have mastered the elements of design and you now can apply them fluently to carry out a piece. It is just fantastic! As others have commented similarly, to see some one who really "gets it, or has it" quickly identifies those who do not. It also indicates those who are trying to bluff their artisitc ability through an untrianed eye. I feel as though I am a creative individual, others might argue against it, but I can tell you that this is humbling to me. Not only are you a master of form but your usage of texture in this application just provides an incredible depth to these pieces. I stare at these images regularly and I see new features all of the time. Keep up the good work! and keep the pictures coming.
-
Thanks, I thought so too. I have these posted in the back of my classroom as examples and I reference them often. I certainly spend time on each section as to what I need the studens to do and understand. Having these in the back of the room aids in helping some of them grasp the whole process. Design or Create is a high level thought process that is not easy to do, well. There is a lot that needs to be understood in order to design well. A lot of my students just struggle with the comprehension of what it is, let alone how to do it. Then you throw in that they have to carry these designs out and it really can be a tough thing to grasp in 9 weeks.
Today I was explaing the whole prcess to a stundet who was asking some questions and I brought him back to my design wall with these pictures. After I helped him through I sgot the idea of scanning them and posting them on here, and here you go. -
Pictures resized......I hope this is better.


-
This is the process that I use to teach technological design. It is a multistep process in which the student is presented with a problem and must then create a solution to that problem. These problems can range from complex to very simple. The concentration here is not on the product as it is more related to the process of designing. I normally select a challenge that fits my students' skill level.
In the example below I presented myself with the problem of designing and fabricating a simple hand forged product, a steel striker. I went through this process to have an example of what I was looking for to hang in my room as a reference. If you look close you will most likely find a few errors in spelling. If you do then you can fingure out why I am a not an English or Language Teacher, Hah!
Anyway, I did not include the actual desing brief as it for some reason will not convert here at home. I will see tomorrow if I can convert it at school. Also, if anybody would like a blank PDF of this packet for use please send me a message. To me it is a fantastic way to teach the desing process. Let me know what you think.


-
Your descriptions were spot on and the photos back it up. Thank you for posting and good show! I enjoy the simplicity of this method and the variety of pipe that one can find. I think for my students though, it would take a bit more to master the art of the hammer and not to drive the cup though the pipe. Or to put horrible dents in the thing.
A side note today I thought about chucking up a piece of steel and turning the same shape. I have not gotten there yet but when I do I will post. Thanks again!
SF -
Wow, you are a true master and I bow to your greatness. I have visited this post before and it leaves me speechless each time.
-
IMHO that is why they are called ASO, becasue they are not anvils. In my neck of the woods I would spend the time and energy searching CL or local auctions for a real anvil. I would not bother trying to plate an ASO.
-
Looks good so far but I would caution you in a few areas. One, leave it modular as you may find you need to adjust the firebox for some of your endeavors. Two, line those blocks with something as they are not really abrasive resistant and they WILL not hold up to the use of flux. It will eat through them sort of like pee does with snow. There are some coatings out there or you could just get a liner block, I did both. Also I guess you plan on drilling through the blocks for your burner. Please make sure your are outside and wear a respirator. Do a search for which coatings and where to buy, it will come up.
-
I love the hood that I have on my forge. It is modular and I can take off what I need to fit in pretty much whatever I want/need. It is a life saver as it removes the nasty stuff that buring coal makes. It also, as mentioned allows for a more constant viewing of the color of the metal.
Another advantage to the hood that I have found is that it helps to minimize the unburnt gases from backing down my blower pipe. My forge is portable and when it is outside the prevailing winds always blow from right to left. My hood was open on the right side, so it goes straight at it. Once, I had a backfire after I added some green coal. Sounded like a shotgun going off and blew my blower pipe completely off. I did some research on here and the experts explained that I had some rather nasty explosive gas back down my blower pipe and just sit there. When I replaced my work into the fire I knocked some hot coals down into the gas and well, boom happened. Since I have enclosed my hood I have had less of the gasses going down after adding green coal. Before that I could hear little chugs or puffs for lack of a better term and I knew I had to be careful and crank a bit before replacing my work. Now, it is not as much of a problem as there is a constant draw up the chimney and a wind break. -
Colleen you are correct there are numerous ways to get this done. For me this took about 2 hours to do once I had the whim. I have since made a few dishes from the form and it seems to be holding up fine. I bet if I made a hundered or so it might start to change, but for now it is working. The operations that you suggest are they formed hot or cold? Not the welding of course but the actual cup? Also if you have any of these forms done I would LOVE to see a picture of them or at least a link to where I can find them.
-
John N, you are correct. Removal of a guard or any piece of safety equipment is not advised as it was there to keep you and others safe.
However, I respectfully disagree with this statement when you point out its danger in the following line.There is nothing particularly unsafe about my suggestion of pinning a heavy bar to the deck with your foot to chop it with a grinder - a 6' bar of 2" dia does not move that much.
grinders can kick,
To be honest I have myself performed this type of operation and I know the risks associated. For me the risks are too great for this to be a common occurance. For you they may be within your acceptable limits and your skill level, for my kids at school no-way. My occupation and possessions are in their hands, literally. As a result I believe that safety is part of the decision of viability. Personally, I do not buy large cuttoff wheels for school as I believe that their drawbacks with newer folks outwiegh their benifits. It is just my opinion, I am sure others and yourself might disagree. And I am okay with that. I believe that cuttoff wheels like most hand held power tools deserve a bit more respect when operating, handling and storing. For my kids moving stuff around, dropping things off tables, plopping them in cabinets, and just learning this stuff in general, the risks are too great. I prefer the bandsaw as it is to me is the safest operation. They can clamp it, lube it, turn it on and stand back while it autofeeds in. When it is done it shuts off and the next one goes at it. It may be slower and a little burred but I will take it over a kickback or disk failure any day. I am not trying to kick a hornets nest here, and I hope that I have not offended you as that is not the goal here. I am just sharing my opinion and experience as well. -
I have a WellSaw at school and a HF special at home. Both of them will handle cutting through metal that thick and thicker. Yes, it is a slow process but remember metal is a pretty durable substance, that is why it lasts so long. I constantly have to tell the kids this. Sure there are faster ways of cutting but it is usaully a compromise. A big shear will cut through that in a blink but it will not maintain a nice edge and will deform. An OA setup will slice through that in seconds but is a bit tell-taling and unless you are good and consistant it will be rough. A cuttoff wheel on a good sized saw will also blaze through it quite quickly. One on a dremel will snap off and hit you in the face. A hacksaw will also give you a snapping good time.
With my saws the right blade really does make a difference as well as coolant. Maybe I missed, it but I am surprized to see that nobody has mentioned the importance of coolant in an operation like this. Coolant in an operation like this keeps the blade cool and retains the cutting hardness in the teeth. It also helps the chips to clear out and reduces the chip load per tooth. And lastly it leaves a better surface finish. It also extends the blade life by not dulling or knocking the teeth. You can still knock the teeth off of the correct blade if you do not clear out the chips. You can also bind the blade nasty tight if you are not clearing them out. I only order one blade for my sawas although I cut lts of different materails. I opnly let the kids cut steel as they really do not comprehend feedrate, coolant, lubrication, and clearing of chips. Trust me, one of the great joys of teaching high school it that you are constantly reminded of everything that can go wrong in an operation like this. If I do not constantly remind them the fisrt thing they do when they jam a blade is lift up on the saw frame. That instantly bends the blade and pops it off of the drive wheel. I can usaully get it out with a bit hammering but it never cuts the same and it does the hula everytime that spot goes past.
If I missed any other references to coolant being mentioned previously, please excuse my ramblings and carry on with life. -
All of those blocks seem fantastic and would be great to manufacture. From what I know about casting and manufacturing, *if I am going to do it, it might as well be bigger. I am not sure what a matchplate for a Hunter maching costs. What I do know is that the real brains and cost is usually with setting up the pattern, gating, risers, and a sprue base, after that it is just pounding sand. When I get a minute to start planning this I am going to feel out the optimal size for me, which would be in the neighborhood of 100 pounds. Anthing less than that I should just go with the SFC block as it is cheapest and seems very well thought out. Anyhting more might become tough to move on a whim or need. John, thatnks for the input on size, through holes, and establishing a radius. As I said I plan on using ductile cast and I can spec which material I need. Form what I know it is better than straight cast, but still can crack. That stuff is tough. I have an NC Tools anvil and according to AIA, they are cast form ductile..


Candle Mold
in Member Projects
Posted